- 800-338-0027
- Contact Us
SEARCH Part # or Keyword:
PRODUCT SEARCH:
Enter a keyword or part number in the box below:
 * Part numbers for
 Tapers and Taper Problems
- Determining the Taper of a Center.
- My center won’t seat in the machine. The center bottoms out before the taper locks.
- The small end of the taper hits before the taper locks in the machine.
- The back of the head of the center hits the face of the machine before the taper locks.
- Checking the taper in the machine where the gage line is recessed.
Determining the taper of a center:
We will assume a standard 5 Morse taper to make this example easier to follow. Standard taper dimensions can be found in the Machinist Handbook or the dead center section of the Riten center catalog.
View Catalog Pages
The gage line diameter is usually easy to find. It is the transition point where the taper ends and the shank continues. However, on some centers the taper continues past the gage line diameter. A wear ring is usually evident on the shank of the tool to help find the gage line. Measure the diameter of the wear ring with calipers and compare the value to the catalog dimensions for tapers. Once you find the gage line, measure the length of the tapered shank from the gage line to the small end of the taper.
In this case, the gage line diameter of a 5MT is 1.748 inches and the taper length is 5-3/16 inches. The length may vary slightly depending on the manufacturer but the diameter should always be the same. Look at other similar tapers and use both the taper length and gage line diameter together to verify your findings.
For instance, a 14 Jarno taper is 1.750 at the gage line but its taper length is 7 inches. Use both measurements and you will never confuse the two. Morse, Jarno and Brown & Sharpe are the most common tapers respectively. Morse tapers are very common while Jarno and B&S tapers are usually found on grinders.
My center won’t seat in the machine. The center bottoms out before the taper locks.
First make sure that the taper in the machine and the taper of the tool are the same. Many tapers are very similar. Standard taper dimensions can be found in the Machinist Handbook or the dead center section of the Riten center catalog.
The small end of the taper hits before the taper locks in the machine.
Some machines have short taper lengths, worn oversize tapers or ejection mechanisms that interfere with the center.
Live centers often have tanged end caps or socket head set screws in the small end of the taper to help protect the taper from damage. Remove the end cap or socket head set screw and reseat the center. If this doesn’t solve the problem follow the instructions on checking the machine taper.
The back of the head of the center hits the face of the machine before the taper locks.
Some machines have face plates and/or recessed tapers. As a result, the gage line is not flush with the face of the machine. This usually crops up when the operator switches from a standard dead center to a center with a larger head diameter for the first time. See checking the taper in the machine where the gage line is recessed.
Checking the taper in the machine where the gage line is recessed.
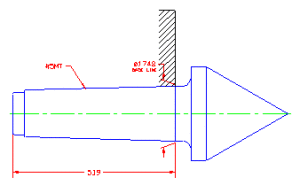
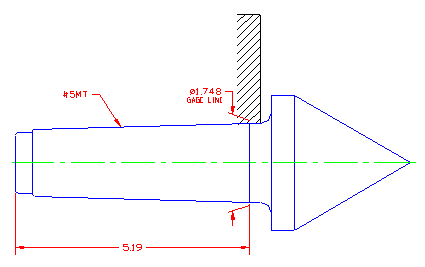
We will assume a 5MT to make this example easier to follow. The taper length of a 5MT is 5-3/16 inches and the gage line diameter is 1.748 inches.
The easiest way to check your machine assumes you have a center that fits the machine in question. First mount the center in the machine. Take a marker and scribe a line around the center flush with the face of the machine. Remember that a taper is a relationship between a gage line diameter and a length. What we are trying to determine is the relationship between the gage line and the taper length for this particular machine (first picture).
Measure the diameter of the scribed mark and the length from the mark to the end of the center. If the gage line and the scribed mark are not the same (second picture) your machine has a face plate and/or a recessed taper. You will need a center with extended clearance to fit this machine properly. Contact Riten for help.
FEATURED PRODUCT
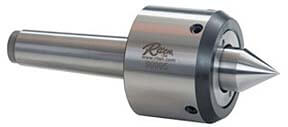
Adjusta-Point Radial Compensating Live Centers
Point can relocated .030” in any direction to compensate for center holes that are not quite on center.